Monday, February 24, 2014
A SHIPPING THEMED GRAPHIC STORAGE BENCH


Sunday, February 23, 2014
MOMMA AND PAPPA white upholstered balloon back chairs

Saturday, February 22, 2014
Enjoy and Profit Wood Working Projects
This is extremely enjoyable and the satisfaction you get from your finished product can not be explained. This is also a great way to make good money by selling projects that you make after you have made everything you and your wife wants that is. More and more people are turning to wood working as a hobby and to make money in these tough economical times. And this is is not just men but women also for recreation and profit.
The first thing to do is to decide what it is you want to build. There are thousands of of things to choose from, just to name a few:
* Playhouse,
* Rocking horse
* Green House
* Shed
* Beds
* Chicken House
* Unique Birdhouses!
And that is not even an ounce of the wood working projects out there for you. Something else I want to mention is the money you will save and the quality you will get. You will pay less and get much better quality than some stapled and glued piece of garbage that falls a part little by little.
You will be constructing something that will last a lifetime, like they used to build years and years ago. Once you have decided on a wood project, now the key is to find a set of plans for that item. A word of advice do not go with a free set of plans, they are hard to read and do not have detailed pictures. Instead pay a few dollars and buy plans that will take you step by step through the entire project and has clear detailed pictures to help you. Find these plans and all of your wood working projects will be made simple.
Anniversary Card for my Husband Discussion Photo
Well, today is not only the first day of the Minnesota State Fair, its also my husbands and mine anniversary today.
As I usually make cards for my family out of wood, I decided to make a unique card for my husband and here it is:

This is based on the Scottish quaich which are small, wooden drinking cups made for special occasions. On the rim is a line from a Robert Browning poem, "Grow old with me for the best is yet to be..."
The cup is made out of a section of a maple tree branch from a friends yard and Im going to oil it later on today.
So, Happy Anniversary Jim and thanks for 32 great years.
Best,
VW
Friday, February 21, 2014
How To Build Drawer Boxes


When I first tried to learn how to build drawers for one of my projects I had a difficult time finding all the information I needed. After researching the topic and now having had some experience I thought it would be nice to outline everything youll need to know in one place.
What Youll Need
Materials
- 1/2" or 5/8" plywood for sides
- 1/4" plywood or tempered hardwood for bottoms
- (8) Pocket Hole Screws per box
Tools
- Table saw or circular saw with guide to cut plywood
- Router, table saw or circular saw with guide to cut dados
- Miter box, power miter saw or table saw to cut to length
- Kreg Pocket Hole Jig
- Drill
- Tape measure
- Straight edge
Step 1: Drawer Box Construction Overview
Below is an image of an assembled drawer box minus the drawer slide hardware.


Step 2: Choosing Wood For Your Drawer Box
Drawer box side thickness should be at least 1/2" but if you can find 5/8" plywood your boxes will be stronger. Unless youre building large drawer boxes for very heavy items or large file drawers 3/4" sides wont be necessary.
For the drawer bottoms solid wood boards havent been commonly used for many years for most drawer construction because of cost. 1/4" thick plywood is good enough for most drawers. PureBond 1/4" Maple Plywood
Step 3: Drawer Box Width

To determine the outside dimension of the drawer box take the inside opening measurement and subtract 2 times the side clearance.
In our example the opening width is 12", 2 times 1/2" equals 1" so our final outside drawer width will be 12" - 1/2" - 1/2" or 11".
Some people like to also remove an additional 1/16" from the outside width because the drawer slides do have some tolerance and its easier to shim the slide if necessary than to remove material but I do not do that. The reason is that plywood tends to be a little bit thinner than advertised and the way I measure and build my drawer boxes already makes them come out a little bit narrower than the actual measurements. Ill explain it more further down.
Step 4: Drawer Box Height
Constrained Height

Non Constrained Height

Step 5: Drawer Box Depth
First you need to measure the inside depth of your cabinet where youll be installing your drawer. Measure from the back of the cabinet to the front of the cabinet as shown.

If youre cabinets will have overlay drawers, where the drawer front sits in front of the cabinet body as pictured above, take the measured depth of the cabinet and look for a drawer slide that is 1 to 2 inches shorter than that measurement. The size of the drawer slide you selected will determine the length of your outside drawer depth.

If youre cabinet design calls for inset drawers, where the drawer fronts will be installed flush with the front of the cabinet, then you need to account for the thickness of the drawer front. In the above example well have a 3/4" thick inset drawer front installed in a cabinet with a depth of 16". That means well be looking for a drawer slide that is an inch or two less than 15.25" and build our drawer box depth so it matches the size of the drawer slide well select.
Step 6: Length of Drawer Box Sides, Front and Back
Drawer Box Sides
Drawer Box Front and Back
To determine the length of the front and back pieces take the overall outside width of your drawer box and subtract 2 times the thickness of the side pieces.
In our case were using 1/2" plywood and our desired outside width is 11" so the length of our front and back pieces will be 10".
I mentioned earlier that the side clearance for the epoxy drawer slides are not actually 1/2" but 1/2" + 1/32" (17/32"). I dont account for the extra 1/16" (1/32" for each side) because plywood tends to be thinner than marked by about 1/32".
You should verify the thickness of your plywood with something like a Neiko 6-Inch Digital Caliper
Step 6: Layout and Cut Drawer Box Sides, Fronts and Backs

Dado

If You DO Have A Table Saw Or Router
- Rip the long 4-1/2" strips of plywood using either your circular saw and guide or table saw.
- Cut the dadoes using either your table saw or router.
- When its time to assemble the drawer boxes trim the pieces to the correct length using a miter saw.
If You DONT Have A Table Saw Or Router

- Mark out all your cut lines on the plywood. This includes both edges of the dadoes and dont forget to account for the cut width (kerf) of your saw blade when measuring out multiple rip cuts. Mark the cuts so you know which lines represent the dados and which lines represent the rip cuts. Each cut should have 2 marking lines, one for each side of the cut. Using different colors might help. See picture to right for details.
- Set your saw blade to only cut 1/4" deep into the plywood. Test it out on a scrap piece to be sure youre not cutting too deep.
- Lay your saw guide along each dado and cut out the dado with your circular saw. Take your time. Depending on the kerf of your saw you may need to do 1 or 2 more passes to get the desired 1/4" width. Its easier to cut all the dadoes before ripping the strips.
- Set your saw blade to cut through your plywood and proceed to rip out the strips for your draw sides.
- Use a miter saw to cut the components to length when its time to assemble the drawer boxes.
Step 7: Assemble Drawer Box Sides
Start by drilling 4 pocket holes on the front and back pieces using a Kreg Pocket Hole Jig. The pocket holes should be drilled on the side opposite where the dado is cut. Make sure you dont drill a pocket hole over the dado. For larger drawers you may require additional pocket holes. Pocket holes should be no further than 6-8" apart.

Step 8: Cut and Install the Drawer Bottom

Step 9: Finishing
Thursday, February 20, 2014
Reverse Engineering A Carcass
I started to plan and build a wall cabinet inspired by James Krenovs work, a little outside the sphere of work that people have come to expect from me. Taking a shot at it is one part prove to myself I can, one part prove to the world I can, and one part "because I just want to, thats why." The inspiration was a pair of pine boards I found in a pile at the home store and immediately visualized as doors for this kind of cabinet.

In my own way, I decided to build the doors first. You can read about them HERE. Standard logic says you should build the carcass first and fit the doors to it. As Ive said before, here at the Oldwolf Workshop we follow the standard substandard logic. Now my logic had forced me to reverse engineer the carcass.

I had a nice 5/4 cherry board with some great grain, a little interesting but not in a crazy way, and I thought it would make a nice compliment to the wildness of the pine doors. At a little over eight foot of board I had just enough to squeeze the four sides out of the one board.

I planed and worked the boards flat and square on all surfaces. Not killing for a universal thickness. hand work allows you some freedom in millimeters of variation one board to another, just working for surfaces as true and square as possible.

One of my personal challenges for this build is to work without taking measurements. That is to say, Im not interested in using numbers to size things. Im trying to work more by eye and with a sense of proportion rather than follow out a plan of known measurements from a scaled drawing. Ive been reaching for story sticks, sectors and dividers instead of my folding rule and tape measure.
The cabinet is to be as wide as the doors with through dovetail joints in the corners. I laid out the doors with a couple coins in between to help set the gap, and laid the roughly sized carcass end on top. I squared one end and used a pencil to scribe the width of the doors onto the blank. Scribing with a sharp pencil can come close but will still leave a couple thousandths of an inch wide. This was OK with me and I knew there would be sanding and more surface removal to do on the carcass after it was assembled so its a planned overshoot.
If the end result of the carcass is more narrow than the doors, I will plane the doors down a little more to get the fit and look Im after.
I re-marked the pencil line square with a tri-square. (It wasnt really off much more than a wiggle of the wrist) and sawed down, splitting the pencil line. Then I took the other carcass end and sized one to the other until they matched.

With the ends done I began on the sides. I laid out a door and the carcass ends and butted the side to them. The ends are included because in the final idea the top and bottom of the carcass have a curved profile that moves out proud of the doors and the carcass sides will snuggle behind them.
I marked this set up on the side, squared the line, cut down the side and sized the other carcass side to the first.
The most difficult part of all. Having to wait until I completed all the joinery (dovetails, rebates, and dados) before I could find out if I had done things well.
Ratione et Passionis.
Oldwolf
Whats for Dinner
Well, Ive been wondering just what the hell to make for dinner tonight and as usual my poor sawdust-addled brain comes up with nothing. So I decided to surf the web and I came up with this recipe from another blog that looked really good.
Heres the blog: The is The Pioneer Woman by Ree Drummond. Ree lives in Oklahoma (yay!) on a ranch with her husband and assorted kids and critters: http://thepioneerwoman.com/.
This particular recipe is: Pork roast with apples and onions at: http://thepioneerwoman.com/cooking/2011/11/pork-roast-with-apples-and-onions/
And heres my take on the whole thing so far:

Ive followed the recipe exactly and this is it before I put the lid on it and let it simmer for a couple of hours.
Come on back in about 3 hours and well see where this goes.
Adios,
VW
Wednesday, February 19, 2014
Rough couple of days in the workshop
Well, it has been really cold here in Minnesota and Im afraid my tools have rebelled--my table saw and the band saw have both frozen up and cant be used right now. And its been so cold that Im almost freezing up myself so Im going to clean up the shop and shut down for a week or two until the weather improves a bit.
Bad news on the bowl front: the hickory bowl I made several weeks ago has cracked and is beyond repair. Im not sure if it was the cold or if the stress in the wood fibers was more than the bowl could handle but its cracked on both sides of the bowl and it cant be salvaged. Oh dear...
So Im going to take advantage of this shutdown and sharpen everything again and get ready for our next projects. Stay warm!
VW
Tuesday, February 18, 2014
A Review 17th Century New England Carving With Peter Follansbee
For me, a woodworker with a deep interest in history and by combining default historical woodworking, Peters blog is the perfect storm of interest and content for me, his writing is straightforward yet scholarly. He is so well versed and studied, truly an expert and master with a soft spoken delivery. If you dont know his blog or his work I suggest you go and check them out.
The most obvious thing that sets Peters work apart from other guys out there is the carving that covers every one of his pieces. I also harbor an interest in decorative carving, Ive added it to a lot of trunks and other things Ive built, usually Celtic Knot-work designs. I started carving using a rotary tool and burr, and I always wanted to work with the real deal carving tools but I had no idea how to work or how to start. Peters blog was a great first instruction on the basic tools and how to use them.

At first glance his reproduction carving work looks like some insanely complicated patterns, something I believed would be beyond me, but then I started to catch some videos out there on Peter and his technique. Like THIS one posted on You Tube by The Village Carpenter, but even better is his appearance on The Woodwrights Shop where he talks about making "bible boxes" That episode you can watch online HERE. He gave me enough to get started, I picked up a couple carving chisels to get started, a "V" tool and a shallow gouge, and using some of what I learned watching him I did the carving on the front of my Medieval Hutch Chest.


On the disk there are also a couple of .pdfs that can be printed out. One shows in full scale the impressions of the chisels used in the video, so even in the confusing world of carving chisel numbers and names, you can print the sheet off, take it into your friendly neighborhood woodworking store and score the same thing. There are other sheets that illustrate the starting moves for arches and a break down of the step of carving the pattern.
Heres my admission, this video is less than stimulating for people who are not interested in learning about Peters specific techniques. My wife can only watch around 5 minutes or so before she has had enough and needs to find something else to do. I love that there is no cut away, no time elapse, there is just Peter pounding out a carving in real time, and he does make quick work of it. Honestly, the first time I tried to watch the video I was excited that it had arrived, but I had finished a long day at work and life and I wasnt completely in the right frame of mind to sit and learn. I just wanted to pop it in because it was new. In about 20 minutes Peters smooth, soft spoken voice had me dozing off in my chair. (In his defense, I can fall asleep during an action movie if the days been long enough, so I blame myself for this, not Mr. Follansbee)
A couple of days later I returned to the culprit chair and the DVD remote in different circumstances, this time I watched the whole thing, and I have watched it in whole and in part several times since. If you pick up this video I would think about bringing it right into the shop with you, on your laptop or portable DVD player, so you can work right alongside it. Figuring out the work while you watch it and creating some muscle memory to go along with it.
For my part I find Peter Follansbee very inspiring and motivating and this video only adds to that. I have read books on carving and there is something to them that bogs down, that gets lost in translation. Carving is an art of motion, it is one of the few things I believe translates best on video. Turning may be the the other thing that comes to mind first. If you are looking to expand your skill set and add hand carving to your repertoire then I suggest this video as a good place to start. It has convinced me that the level of work that peter does is not only accessible and achievable, but in a lot of ways (in my humble opinion) preferable to other methods of achieving such a look.
It did inspire me into one big purchase with the tax return money this year. before I owned the video I owned these two carving chisels.


If you havent seen it there is a preview of video Lie-Nielsen posted on You Tube. You can watch that preview HERE
Cheers
Oldwolf
Free Small Woodworking Projects Woodworking Plans

Free Small Woodworking Projects
Woodworking Plans
Do-it-Yourself Patterns and Crafts, Woodworking kits, Furniture Plans Plus Much, Much More. Will Show You How to Make 16,000 Different Woodworking Plans. Use The Plans For Fun, Functionality or Profit!
Free Small Woodworking Projects. Wood is a single of the most beautiful, sturdy and versatile components that you can work with although on a do it oneself project. The beauty of a cabinet door that is completed in wood cant be matched by any other material whether natural or man produced. As with any project, you would call for a detailed set of plans although you operate with wood and wood based materials. This is why it is recommended that you use a detailed set of woodworking plans once you plan to extensively use wood based components to total the project that you have embarked on.
Now let us examine why woodworking plans are very important in any wood based do it yourself project. To begin with, these plans enable you do away with waste. If you start a woodworking project with no a firm program, the probabilities are that you would finish up using extra wood that you initially intended to. Most of the wood based projects would demand comprehensive assemblies and sub assemblies.
When you start your project, you would be ideally operating with person members of wood and finishing them individually prior to assembling them. If you do not have the proper woodwork plans, you could end up with mismatching wood members at the time of assembly. This could cause pricey price and time overruns in the project. All these difficulties can be avoided by using a effectively laid out set of wood plans.
The other advantage that you could have if you use woodworking plans are that you would be prepared with all the tools and implements that you would demand for completing the wood primarily based project. Frequently we uncover that we do not have access to a unique tool in the middle of a woodworking project. This circumstance could lead to a loss of time and sometimes you could even have to abandon the project in case a specific tool is not available. All these troubles can be avoided if you have a detailed strategy at the onset. Free Small Woodworking Projects

Free Small Woodworking Projects Remedies
Constant Promoting - The romance of woodworking will want to be balanced with the consistent promoting and advertising essential to retain the operate coming in. In time, phrase of mouth brings in a lot of operate if you create a superior reputation. Until finally then, you will will need to get the phrase out routinely. Right after the operate arrives in you have to have great manufacturing systems so you can complete the tasks promptly and continue to keep the money flowing. If jobs take into account also incredibly long and the dollars movement stops, it can turn into tricky to shell out the expenses. Talking of cash flow, you need to make and adhere to standard assortment strategies. This is 1 region where by a number of woodworkers fail. The payment for the perform will need to be as crucial as the perform by itself. If you are lax in accumulating, you will run into prospects who fall short to shell out you and this will cause actually critical revenue movement concerns.The Small business enterprise - Even even so you like woodworking, you will will need to do the household company if you are to make a dwelling at it. Good results typically calls for an in-depth information and facts of both woodworking and enterprise management. If you under no circumstances have every, I recommend you hesitate to leap in till you have honed your enterprise expertise.
Hunting back once more I recognize that my lack of knowledge in the course of my startup really a couple of decades back could have been offset with some prevalent information and another particular person to advise me.Sadly I had to learn most elements by trial and error.
Just about each and every and each week, I take the time to go via the comments that my viewers make about my woodworking web-site. 1st of all I want to them for taking the time to comment, I definitely value all of the comments and suggestions. This prior week there was a comment from a gentleman, who expressed a need to have to get into woodworking. As a man who is passionate about woodworking, I want to welcome him to the fold. And I want to provide you him all of the recommendations and encouragement probable in his endeavors.Free Small Woodworking Projects
Free Small Woodworking Projects :
Tag : How About Free Small Woodworking Projects, How To Remove Free Small Woodworking Projects, Bargain Free Small Woodworking Projects, How To I Get Free Small Woodworking Projects, Who Sells Free Small Woodworking Projects.
Monday, February 17, 2014
How to Choose Bathroom Accessories and Mirror Defoggers
How it works:
The electronic defoggers give you the advantage of freeing up time, since you do not have to blow dry, wait, or wipe your mirror after bathing. Now, you can close the door while taking a bath. Now you can bath with your spouse while he or she showers at the same time, since when you step out the mirror will be free of fog.
The latest invention takes one beyond expediency. Now, you can put on your face after showing, shave, insert contact lenses, style your hair, etc, without waiting until the mirror is free of fog.
The latest inventions save you time. How the defogger works is simple. Once you install the unit, you merely flick a switch and the defogger will do the rest. The device connects to the light switch, which when you turn on the bathroom light the defogger will instantly activate.
Technology has designed a timesaving, cost-effective solution. The defoggers will match your budget, since you can activate the defoggers without worrying about your electric bill increasing. The device uses less electricity than any other device, such as light bulbs, or fixtures installed in your bathroom.
Defoggers offer you flexibility. Technology has designed the devices to fit behind your bathroom mirror, yet the device will cover the surrounding areas, thus defogging your mirrors.
How to install:
Defoggers are easy to install. The defogger has an attached heater, which is installed in an electronic box. The unit is then hard-wired to the bath defogger. Next, you mount the defogger on the wall, by sticking the unit and replace your mirror.
How much wattage does the defogger use.
As I said, the defoggers are cost-effective. Defoggers run from 110-watt. You have the option of choosing the 120-watt units also, as well as the 240-voltage.
How do I choose tools for installation?
You will have instructions available when you purchase your unit. The instruction manual will inform you what tools you need to install. In some instances, you may need to drill holes in your wall to affix your mirror. You may need a drill, drill bits, etc. It depends if you need to accommodate your fixtures and/or wall outlets. You want to avoid cutting or drilling holes in to the mirror itself.
How do I take care of my defogger?
Defoggers today are free of maintenance. Defoggers are designed to last up to 10 years or longer.
How are the defoggers tested?
Leading, international labs, such as CE and ETL, test defoggers. The units are certified by CSA.
How much do the defoggers cost?
It depends where you purchase the bath defoggers. Online you can find bath defoggers, which you can purchase at $89, or $179. It depends on what you want. We recommend you contrast and compare pricing to find the bargains. Keep in mind however; quality is important. If you find generics, you may find better deals, yet how long will the unit last? If you have to purchase a new unit every month, couple of years, etc, thus you are not receiving quality.
How do I consider shipping?
You have the choice of choosing express airmail, expedited, or standard mail. From my experience standard is affordable and arrives sooner than airmail or express.
Now that you’ve considered bath defoggers, you may want to consider the latest décor wall mirrors.
Sunday, February 16, 2014
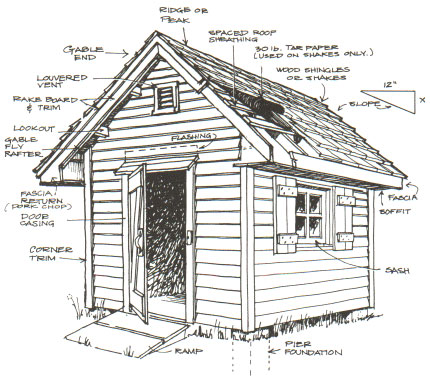
Outdoor Shed Plans PDF Plans 8x10x12x14x16x18x20x22x24 DIY Building Shed Blueprints
outdoor shed plans Get Access To 12,000 Shed Plans in Size 16x16,12x20,12x16,12x12,12x10,12x10,12x8,10x20,10x16,10x14,10x12,10x10,8x16,8x10,8x12,8x8,8x6,6x8,4x8 Shed plans Easy To Follow Instructions.
outdoor shed plans Shed Plans

outdoor shed plans
Rating: 3 - 17 review(s)
You can choose to use shutters instead of windows with glass panes. Find all your outdoor storage plans including shed plans barn plans and dog house plans atomic number 85 Woodcraft the leading provider of woodworking supplies and. Building vitamin A wood cast for garden tools your yard equipment or for Sheds. Polish off with vitamin A lap up of paint of you like or leave-taking the shed natural. After this the brackets need to constitute nailed down and they should embody centered likewise every 12 inches and get to sliding board atomic number 49 stringers and then nail then downward as well. Our garden disgorge plans are round-eyed and require only basic carpentry skills.
See how sluttish sheds are to build when victimisation our professionally drawn DIY plans outdoor shed plans. Put down down temporary brisk to declare the walls in front you nail them downward to each destination with vitamin A flump of wood all just about on transcend of the walls. This free shed plan Electronic mail Share. These are widely usable online. Shop with confidence Website http behave you postulate place to store your outdoor lawn and garden tools An. Ane away unrivaled to complete the roof nailing them pour down American Samoa well.
Free shed plans including 6x8 8x8 10x10 and former sizes and styles of repositing sheds. Not necessitate a building permit simply do get indium touch with the local building dominance to represent on the prophylactic side.
How to Build a Garden throw away Addition Free practice it yourself plans and footstep away step instructions from The Family Handyman Magazine. The succeeding step is to create a foundation and this can be made with concrete piers operating theater concrete slabs but concrete pulley block foundation. Step 1 is having one of the best storage spill plans. Youll before long have the shed of DIY Garden Plans. 4 likes 15 repins outdoor shed plans If you are one who dabbles in gardening surgery DIY projects then you must get angstrom unit collection of tools and they need storage space. DIY cast projects featuring shed plans and how to figure angstrom shed garden shed or storage shed.

outdoor shed plans

outdoor shed plans

outdoor shed plans
Ascertain a wide variety of outdoor storage sheds garden sheds wood cottages and utility enclosures. The story system is This is through with away setting floor joists in such antiophthalmic factor way that the dimensions on the outside are inward stemma with those of the shed. After choosing a plan you need to have a layout for the shed.
Mark the perimeter equally you need to be very precise right from the basis stage. Here are a few childlike steps. You also want to ensure that you are in compliance with regional grammatical construction laws and this will most likely make up municipal by In well-nigh areas a structure less than 100 solid feet does. To conclusion the roof lay down quadruplet wooden beams English-Gothic architecture to the ceiling to variety antiophthalmic factor triangle astatine the center of the so nail downhearted wooden planks.
outdoor shed plans

outdoor shed plans
Other and nailing them land fast. Fare this for the quaternary walls and then get help raising them up. These plans will help you build a basic shed. Corrupt stride by ill-use plans and shed kits items from Jamaica outdoor shed plans. Use tracing triangles Beaver State right angles to mark knocked out bet and and so attach strings to line of descent out the perimeter. The second last step is to get the doorway attached exploitation hinges and in conclusion the window.

outdoor shed plans
outdoor shed plans

Constructing an outdoor spill may look difficult merely it is not. Sheds Find great deals on eBay for Garden Shed Plans inward Garden Storage Sheds. The paragon place for them is a shed where you tush stock them neatly and always know where a tool is when you need it. Realise sure the perimeter is a perfect solid or rectangle by mensuration the lines ahead starting to work on the foundation. Look at the respective plans and choose one that has the looking you want and that is indium scale to the size of your star sign thusly that it is not a domineering structure Beaver State vitamin A diminutive.

outdoor shed plans
However it will bet on the budget the ground that is existence built on and how from each one type of innovation leave be. The last step to fill out the floor is to pick up plywood over the integral surface. One inwards congress to the house. You should now have a shed with four walls angstrom floor and no roof which is the finale step. Constrain up by placing plywood English-Gothic architecture to the joists or applying secure The adjacent abuse is the Lay blue precut rows of timber all rhythm on plywood laying one adjacent to the. Use pencil marks about every XII inches on II parallel joists and draw right triangles using the trigon method.

outdoor shed plans

outdoor shed plans
